A Learning Path To Offload And Optimize OpenMP* Code On GPUs
Context:
Application developers use parallel programming to exploit the full potential of multicore hardware. OpenMP is an Application Programming Interface (API) that enables parallel programming in C, C++, and Fortran applications. Graphic Processing Units (GPUs) are powerful computation devices that inherently feature parallel architectures. I created a learning path for developers who employ OpenMP directives in their applications and want to use Intel GPUs for fast execution.
The Work:
Step 1: Create a Persona
My first step was to understand the community I was writing for. Developers who program in OpenMP operate in several industries and use a variety of software tools for their programming and testing needs. I interviewed product teams at Intel that interact with these developers to build their tools. I learned more about the typical background for a developer, the workflow they follow, some technical challenges in that workflow, and ways to remove those challenges.
These interviews helped me create a persona for the typical OpenMP Offload user.
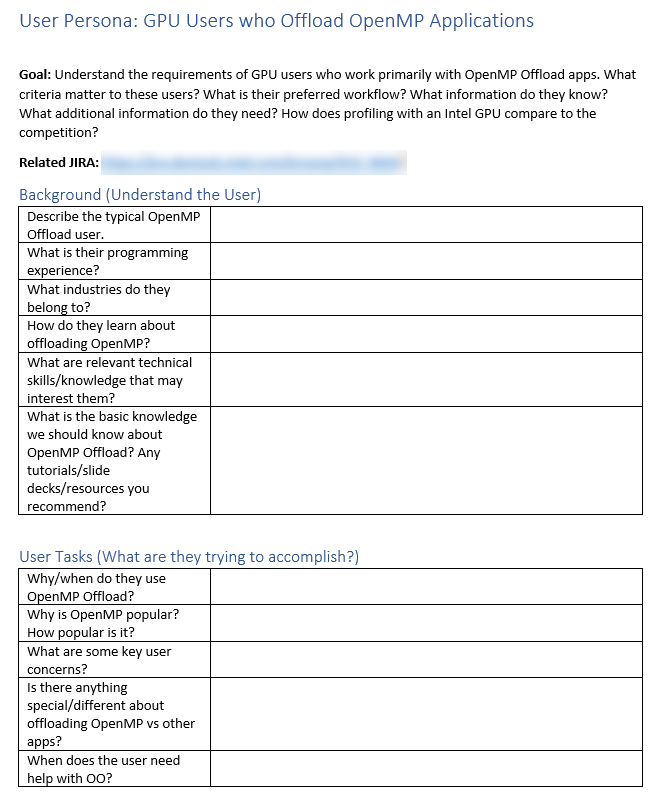
Additionally, I conducted an internal user experience study with my interview subjects. I encouraged them to step into the shoes of our target user and explore the existing content pieces, without relying on their Intel knowledge to find answers.
The persona and UX study helped me understand:
- What my target audience knows.
- What they want to know.
- Where they get stuck.
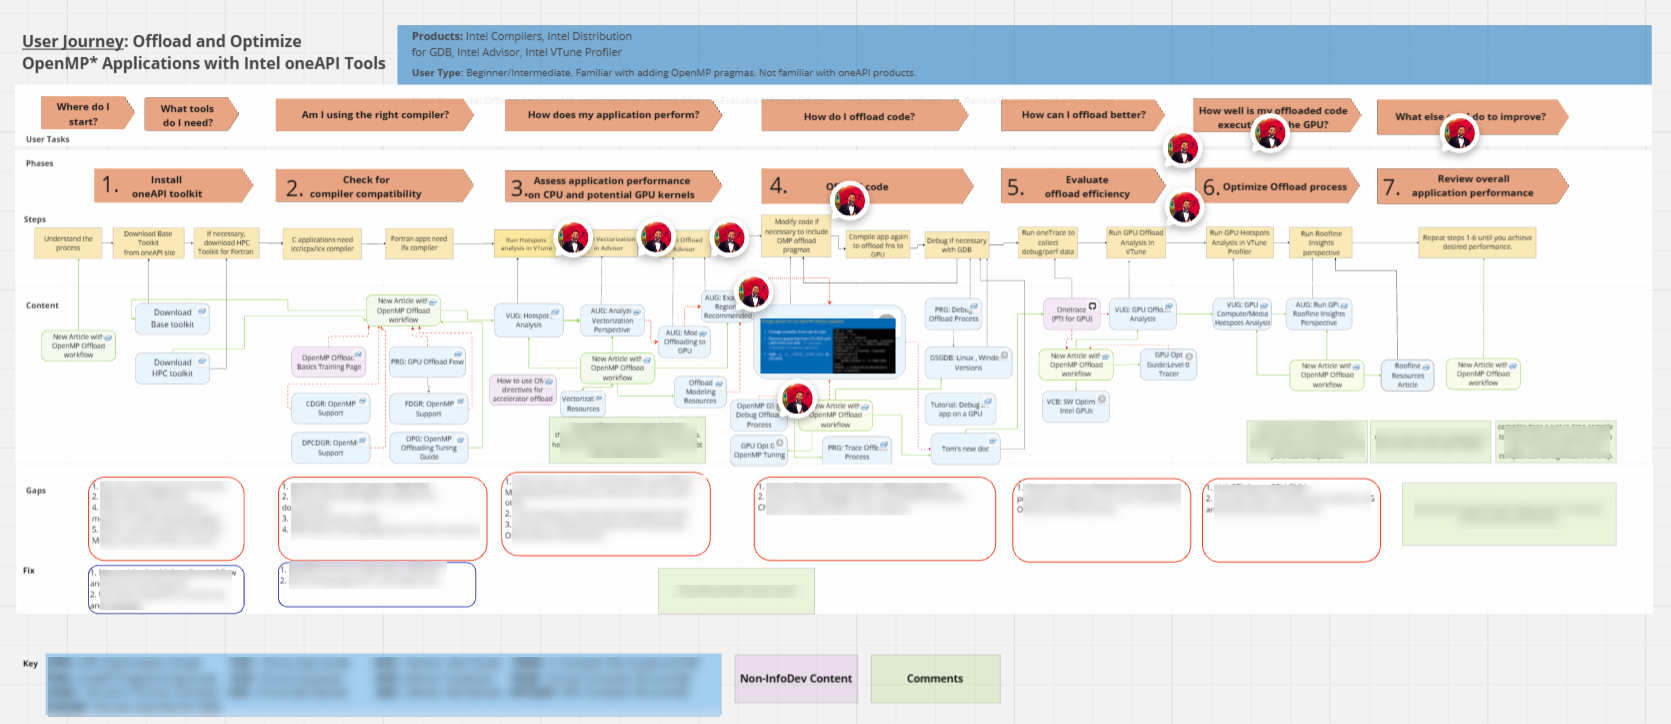
Step 2: Build the Customer Journey Map
My next step was to develop the workflow we should recommend. This workflow should take the customer on a single journey from start to finish with clear steps in between. So, I used Miro to create a Customer Journey Map (CJM).
I chalked out the tasks in the user workflow and mapped them into actions the developer would need to complete with Intel tools and content to complete those tasks. For each of those actions, I examined the technical content available to support the user. Where content was missing, duplicated, or incorrect, I made notes. Also, I drew connections to see how these pieces of content linked to each other. Through this exercise, I could see the gaps in the user journey and the unlinked pieces of content that users would never find.
This work involved reviews of hundreds of topics across several documents, product sets, and toolkits. I knew I’d want to create a learning path that laid out the larger breadcrumbs for this journey, so I made sure to link every major step to this learning path.
There was a lot of work ahead!
Step 3: Build the Learning Path
For the documents I managed and the learning path I was developing, I prepared and followed a timeline for content additions and linking. For the affected documents that I did not manage, I worked with their owners to complete the work. After I wrote out the learning path, I worked with our web team, editors, and graphic designers to bring this article to life.
Step 4: Prepare a Guided Code Sample
I understood quickly that developers are hungry for guided code samples. I partnered with a technical consulting engineer who updated a guided sample on GitHub for this purpose. Together, we refactored the README file for this sample to mirror the workflow in the learning path. Each step of the workflow connected the README and learning path, so the developer had the right amount of information to complete their task.
Result:
When the project was completed, we published the new learning path and promoted the guided sample in our Github repository. I used available marketing channels and customer newsletters to promote the new learning path and set up a report in Adobe Analytics to track web traffic.
This project earned me a Divisional Recognition Award (DRA)!
Check out these pages!
Post a comment